Related Resources
This lesson covers the preferences feature, which is an optional feature in Customer Choice wine clubs. Customer choice preferences allow you to set certain preferences as default for releases. That way, a customer wouldn’t have to customize their orders with each release.
Page Contents
Navigating to the Wine Clubs module

The Wine Clubs module is in OrderPort Admin. Go to orderport.net to login.
Scroll down to the bottom of the dashboard page, and you will find the Services option. Click the second option.

You can also hover over the three lines toward the top right of the dashboard page.
The Wine Clubs module is under the Services column.
Setting Up Preferences
Open your customer choice wine club, then click on the Club Options.

Under the Preference Settings, make sure that Preferences are enabled. Once enabled, you will also see the show orders to customer on the webstore. This setting prevents customers from editing orders themselves. Instead uses their preferences to create the carts.

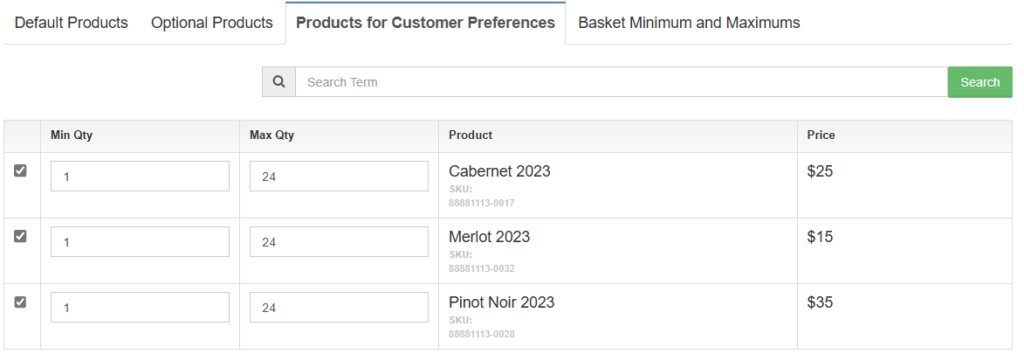
Under the Products for Customer Preferences tab, you can add products to be available for preferences, with minimum and maximum quantities.
If you ever remove a product as an option for preferences, this will remove it from each individual customer’s preferences as well.

Updating a Customer’s Preferences
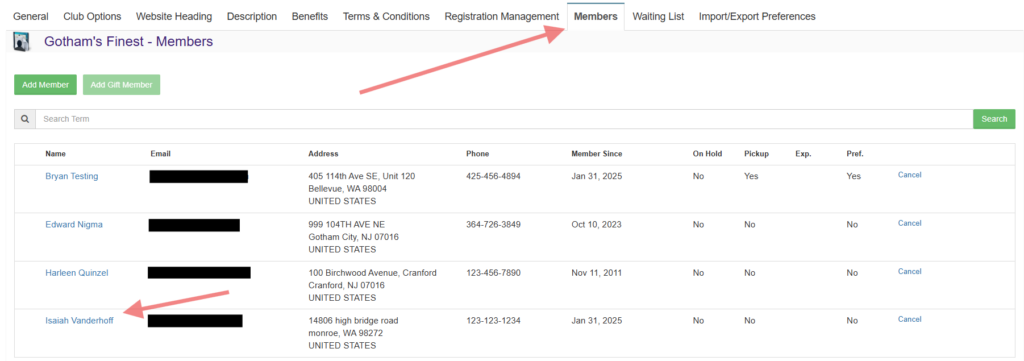
Customers cannot currently change their preferences on the webstore. Instead, go to the Members tab for the club, then click on the customer’s name.

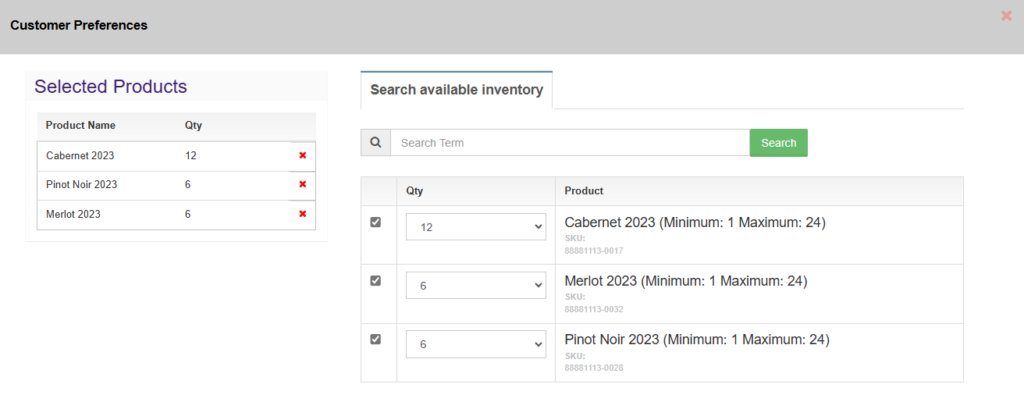
Go to the Memberships tab, then click Wine Preferences.

Here, you can configure the preferences within the minimum and maximum settings. If preferences are set, these products will override the default products, including required products.

Bulk Updating Customer Preferences
If you need to set or update many preferences at once, you can use the Import/Export Preferences tab for the club. To do this, you will need to have customer numbers and product SKUs on hand.

1. Export the preferences to an Excel file. This will download current preferences.

2. Set customer preferences.
A blank cell to the right of the customer number means that there are no preferences.
To add preferences to a customer, click on the Home tab, then click Find and Select. You can also use ctrl + F. Enter the customer number into the find field, then search.
To the right of the customer number, add in preferences using the following format: “##:SKU, ##:SKU” (e.g. 12:88881113-0017, 6:88881113-0032, 6:88881113-0028).

3. After you save the file, go back to the Import/Export Preferences tab, then upload the file.

