Related Resources
The Mailchimp integration allows you to send marketing campaigns from Mailchimp with up-to-date contact information pulled directly from OrderPort. Customer data is automatically synced in Mailchimp, meaning you will not have to upload mailing lists from OrderPort each time you send a campaign.
Integration Information
The integration requires you to already have a Mailchimp account, as well as have the OrderPort marketing module enabled.
The first thing you need to do is contact helpdesk@orderport.net and ask for the Mailchimp integration to be enabled.
The integration uses the API key from your Mailchimp account. Please visit this article from Mailchimp to learn how to fetch the key: About API Keys | Mailchimp
Once the API key is entered into OrderPort, OrderPort will send the latest customer information to Mailchimp whenever a sync occurs. Syncs are activated whenever the marketing module is opened. Since they are done overnight, whenever you are planning on sending a campaign, we recommend you open the Marketing module 24 hours in advance.
Importantly, the integration is one directional. You should not be updating customer information within Mailchimp, as that will not update on OrderPort’s side of things. Instead, update the information within OrderPort and Mailchimp will update accordingly.
Enabling the Integration in OrderPort
Once you have a Mailchimp API key, you are ready to enter it into OrderPort and start the integration. This is done within the Marketing module of OrderPort Admin.

Go to orderport.net to login.
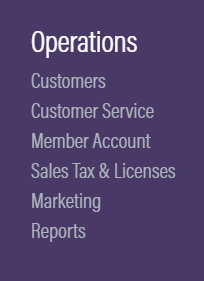
Scroll down to the bottom of the dashboard page, and you will find the Operations option.
Once in the Marketing module, you will see a list of all your users.
You can also hover over the three lines toward the top right of the dashboard page.
The Marketing module is under the Operations column.
Once in the Marketing module, go to the third party tab.

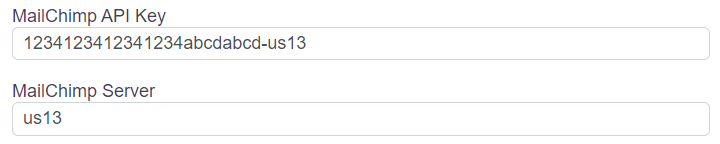
Scroll down to the bottom of the page, and you will find the Mailchimp options to the left. Paste the entire API key into the first box. Take the last section of the key, after the hyphen, and put that into the Mailchimp Server section. In the example below, you see that “us13” is the server. Now, click ![]() . The syncing will now begin, and you will find your lists in Mailchimp by the next day.
. The syncing will now begin, and you will find your lists in Mailchimp by the next day.